When working on putting together a productivity solution we often go looking for a preconstructed application that does everything. Well, we go looking...we don't often succeed. With that in mind, I decided it was worth trying to use one of the most common tools in our arsenal, Microsoft Word, to implement a version of the Bullet Journal system.
As usual, I placed some strict requirements on my solution:
- The implementation had to work on the desktop as well as the web version of Microsoft Word
- It had to allow for tracking tasks as well as general notes
- It had to support collections
- It needed to be able to be set up on the fly (no pre-downloaded templates required)
- It had to be simple enough for anyone to implement
Based on those requirements, I was able to create a very serviceable version of the Bullet Journal methodology using Word.
Step 1 - A blank page
There aren't any special features that need to be enabled in Word for this implementation, but you do need to turn on the Navigation Pane view. This can be done from View > Navigation Pane. The Navigation Pane creates a dynamic table of contents based on the use of the header styles in Word. We'll talk more about header styles in a bit.
Step 2 - Create a Heading
For my first heading, I added a Section for Daily Notes for today. Nothing fancy here...just type it in. The trick is once you're done keying, press Ctrl-Alt-1 on your keyboard (sorry Mac users, I don't know what your keyboard shortcut is so you may have to use the ribbon bar to apply the Header 1 style). Ctrl-Alt-1 applies the Heading 1 style to the text.
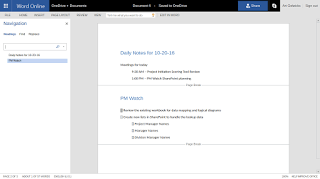
The visual style changes making it easy to call out on the page AND the line now shows up in the Navigation View. Skipping one line I pressed Ctrl-Enter to insert a page break and I was done my first section.
Step 3 - Create a Collection
Since I have a number of projects in flight it made sense to add a Collection for the project information. After the page break I added in step 2 I entered a title for the collection and applied the Heading 1 style again. Next, I started to add some of my notes for the project.
Step 4 - Dealing with Tasks
Some of the notes I captured were actual tasks so I needed a way to not only identify them as such but also be able to mark when they were completed as well as find them in the journal. The simple solution was to begin each task with a [] (double square bracket). This way they were easy to pick out visually on the page. You can see from the image below what this wound up looking like.
Putting it to use
Now that the basic structure was in place, could start using the Navigation Pane to move from section to section in the document by just clicking on the title in the Navigation Pane.
TIP - This part works even better on the desktop in Print View because Word scrolls right to the Header making each section look and act as truly separate pages.
Where this started to come into its own is when I used the search box in the Navigation Pane to locate all the tasks in the document by searching for "[]". You can see what happens below:
The search term not only finds the items in the document, but Word highlights them AND shows them specifically in the Navigation Pane making access to the tasks quick and easy.
This is just the beginning of a Bullet Journal style implementation in Word. I'm going to keep working with this to refine and add features but you can see within a few minutes you can be up and running with your own Word Journal.


